Friday 11 May 2018

Unit 67 animation


Unit 67 3D Animation – Task 2


I will start by stating the models used in my animation are not mine.
Chrome-extension://gblkchompccdlgleecnffhlefbhejhhb


Because I got my models from Maximo I didn’t have to rig them, however if I wanted to, I would have to go to skeleton and create joints then draw out the skeleton it’s always better to start from the bottom when doing this. Next by selecting the limbs and corosponding joints and pressing P it will parent the limbs and you can control it with the bones.


I kept all of the assets in one folder, and named them accordingly so I could find them easily and pick up exactly from where I left off. I had a problem with a version mismatch of Maya at one point however this was resolved quickly, all I had to do was extract the file instead of just saving it.


The basic animation is created by moving these bones and the pressing S to save the key frames, Maya will then fill in the frames inbetween and create the movement.

To add movement to the camera we first have to make one by going to create, cameras, camera, it will add a camera that we can watch the animation through and move around in the scene. We can do this by using the key frames and just moving the camera.


Evaluation


The starting idea for my animation was quite tame and I realised it wasn’t going to last at least 20 seconds. After animating for a while I got the hang of it and thought that I could expand my ideas a bit and because of the finished animation became very different. In my brief I said that I would create a trailer for my game that lasts between 20 and 30 seconds, the animation serves as a trailer for my game very well. I could’ve handled my time a bit better however it took me a while to get my head around actually animating it, once I realised how simple it was I was able to get a lot of work done in a short space of time.
The actual animation itself came out well for a first go however some parts were still not quite right, if I had more time I would use it to refine the animation to try and get it as close to a professional level as possible. In terms of aesthetics I didn't quite have time to add lighting and the floor I had in place didn't render and so I would in future sort these bits out earlier to improve the overall quality of my animation. In future I would have planned more ideas and created more storyboards to really get a feel of what I was doing before going into it.


Friday 13 April 2018

3D Modelling and Animation


3D Modelling and Animation


You will generate ideas and specification documentation for a trailer/advert or cut-scene using
3D animation software which lasts between 20 and 30 seconds. It must match one of the
scenario briefs given and your own specifications.

Create your own brief based on the assignment scenario

Consider and interpret the brief generating and recording ideas

Develop the idea carrying out pre-production planning for that while compiling a
comprehensive development log evidencing your creative work.

Development materials include storyboards, thumbnail sketches, mood board, legal and
constraints. You can use concept art from Unit 69: Drawing Concept Art for Computer Games

Create an animation in Autodesk Maya which lasts at least 30 seconds based on your idea
developed in Task 1.

You must also log your process using for example, asset management, working environment,
tools, animation technique and virtual camera.

Review your own 3D animation production work.


For this task we are going to have to plan out and create an animation for either our game or based around the Pixar short Luxo Jr, these animations will have to be at least 30 seconds long and be made in Maya. To help with idea generation I will be creating storyboards that outline the ideas of my animation, I may deviate from these ideas when it comes to production. I will first attempt the production of a trailer for my game however if this turns out to bee too challenging I shall create the Luxo Jr inspired version.
Main Storyboard

Tuesday 20 March 2018

OOD Assessment 2

Unit 71: Object Oriented design for computer games.


Concepts and principles-

I would say that Game Maker is a lot simpler to use and easier to understand than Unreal is and the Action Event stuff is all just drag and drop, the actions are very easy to understand. In Unreal 4 the blueprinting takes a while to get your head around however when you finally do it makes sense and is all very logical. 
In terms of reusability both engines have this as you are able to make almost anything you can imagine, you are a lot more limited in Game Maker than you are in Unreal as it can only act as a 2D game engine whereas Unreal acts as both 2D and 3D. In terms of efficiency you can make a very quick game in Game Maker however it will never be as good a quality as a game you could make in Unreal 4. 


Game Object -

 In Game Maker we have to make sprites and set them as objects specifically for playable characters so that we can have something that the player can control, we can do this through the sprite editor that is built into Game Maker. We also have to make sprites for things like walls and platforms we would have in the game so that we can place them into the room and have our character and any enemies collide with them. In terms of Unreal 4, it can act as both a 3D and 2D game engine,however there is no in built sprite or model editor this means that you have to make either sprites or models in a different program and import them in to be used.

A room in Game Maker with Walls.
Walls and rooms in Game Maker are extremely easy to set up, you just create a room in the options on the left and then you can drag and drop everything into in order to flesh the game out. For example if I were to make the sprite of a platform and set up collision for it with my character i would then just drag and drop it into the room I have created to make a platform my character could jump onto. In Unreal 4 a room isn't quite as simple as it could mean many different things, is the room the entire level or simply one area of it, if we look at it in the same way as Game Maker we would take it to mean the entire level. The main comparison to walls would be and buildings or areas our character can not get through, there are several ways that this could happen for example if we made a building in Maya and imported it to Unreal then the sides of the buildings would be walls for our character since he cannot get through them. However if we also used the landscape tool to raise the ground so our character could not get past this would also act as a wall in the same sense. 

Power ups work pretty much the same way in both Game Maker and Unreal 4, you basically want to make it so that when your character touches a certain object it disappears and boosts your character in some way. To have this in Game Maker you can make it so that when your character collides with the power up object it is destroyed and gets a speed boost for example. In Unreal it is very much the same thing, In my game at the moment I have a health boost that when you walk over it a particle effect spawns at the player location and the power up disappears, the players health is then increased.


Object Properties-

We also use things called Action Event in Game Maker this is a simple drag and drop mechanic that really simplifies the whole coding mechanic. Underneath you can see an example of how you can make a health bar in Game Maker using these blue prints.

HEALTH BAR IN GAME MAKER:   https://youtu.be/kBQHGHKkePk?t=289

First you have to draw the health bar on the screen with the draw command and then set the size of it. In this example you can then set the game to reset when the health is smaller than 1.

To set the health in unreal it can be a little complicated depending on how you do it, personally I found it quite easy. You simply have to set a float variable for health so that you can increase and decrease it, you can then drag and drop a bar into the window and set its colour, sections and size on the right side of the screen.
Image result for game maker moving code

This is an example of code in Game Maker that you can use to make your character walk and jump. As you can see it is fairly simple, this shows that when the left arrow is pressed the character will move left and it also shows how far it will move.


Related image

This is the code for movement in Unreal 4 as you can see it is a bit more complex than the Game Maker counterpart, because it is a 3D engine the code has to get the characters position in the world via velocity and then uses the key inputs for movement.


After you have set the movement you would then have to set the speed at which your object will move, to do this in Game Maker is very simple, since it is a 2D engine we are working in, you can use the code below to set the speed and direction of the instance.
if keyboard_check(vk_up) speed = 2;
if keyboard_check(vk_left) direction += 5;
if keyboard_check(vk_right) direction -= 5;

It is also quite simple to set the characters speed in Unreal, you can use the blueprint below to change the max speed for your character. You can just get the variable Character Movement and Set Max Walk Speed to whatever number you like.
MaxWalk1


Actions and Events-

Scoring is a very easy concept to get you head around, there are two ways that you can achieve a good scoring system and this is by either using the action event score button or coding a scoring system in a draw event and then applying it to all of the events you need it on. You simply increase the vale by whatever you like when a certain event happens like a enemy dying for example.
It is done pretty much the same way in Unreal 4, however I find it is a lot easier to visualise the actual event happening.
Image result for scoring system in unreal 4

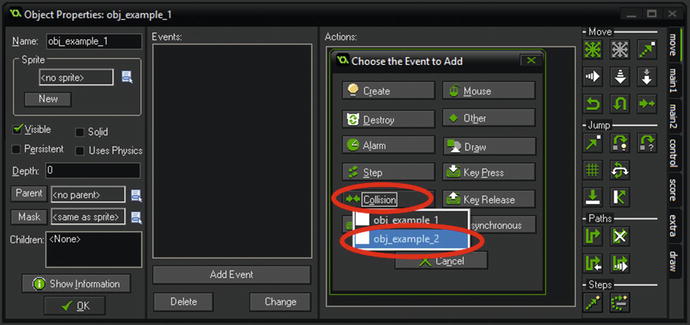
To make collision in Game Maker you simply add the collision event onto the character and object so that they cant go though each other. You can choose from a bunch of different events to happen when the collision takes place for example you could set the speed to 0 so the character will stop moving.Image result for game maker collision

To give collision to any of the objects you import into Unreal you first need to select keep collision and then set it to use simple as complex. This will wrap the model in a mesh that acts as the collision.
Image result for Unreal 4 use simple as complex


We can use the destroy event to get rid of any sprites in Game Maker when a certain event happens, for example if you shoot an enemy, when it collides with the bullet the sprite will be destroyed and give the effect that you have killed it. You do the exact same thing in Unreal 4, you just destroy to entity whenever you need via blueprints.


Inheritance -

Parenting in Game Maker is a very useful tool that overall saves you a lot of time and confusion. As an example if you have 3 enemies that all have the same collision event with your character you can set up a parent for all three of these and then just set up one collision event with the parent to save you doing 3 different ones. To keep it neat and keep your game structured you would use object hierarchy where parent 1 is child of parent 2 is child of parent 3. In Unreal you can 'Set Owner' of another action and then reference that owner in other actions.
Image result for parents in game maker


Tuesday 27 February 2018

Unit 71 OO DESIGN


Unit 71: Object Orientated Design for Computer Games


In Game Maker the first step we have to take is to make sprites, these sprites then become objects that you can apply code to and this is what makes Game Maker OO design. Unreal Engine 4 is OO design because you can apply code to pretty much everything. Some similarities between these too engines would be in the code

Image result for game maker moving code


This is an example of code in Game Maker that you can use to make your character walk and jump. As you can see it is fairly simple, this shows that when the left arrow is pressed the character will move left and it also shows how far it will move.


Related image
This is the code for movement in Unreal 4 as you can see it is a bit more complex than the Game Maker counterpart, because it is a 3D engine the code has to get the characters position in the world via velocity and then uses the key inputs for movement.


We also use things called Action Event in Game Maker this is a simple drag and drop mechanic that really simplifies the whole coding mechanic. Underneath you can see an example of how you can make a health bar in Game Maker using these blue prints.

HEALTH BAR IN GAME MAKER:   https://youtu.be/kBQHGHKkePk?t=289

First you have to draw the health bar on the screen with the draw command and then set the size of it. In this example you can then set the game to reset when the health is smaller than 1.

To set the health in unreal it can be a little complicated depending on how you do it, personally I found it quite easy. You simply have to set a float variable for health so that you can increase and decrease it, you can then drag and drop a bar into the window and set its colour, sections and size on the right side of the screen.Related image


Another difference you can see between the two is that Game Maker is a 2D game engine and Unreal Engine 4 is a 3D engine. This means we create 2D sprites either in Game Maker or another program for use in the game whereas this isn't the case for Unreal we have to make a 3D model in a program like Maya, ZBrush or Blender and then import them for use in Unreal. When you code in Game Maker it will save as a GML file and in Unreal it simply saves the entire file as Unreal Engine Project.
Image result for gml file format


I can see the benefits that each of the engines offer as they are both suited for making different kinds of games, I did really enjoy using Game Maker to design a 2D game however it took a long time to make a very simple end product. Comparing this to Unreal, I was able to make something that I feel is a lot more impressive in a shorter space of time. I personally enjoy Unreal more because it feels more professional and you can create things on a lot larger scale. I also really prefer creating models and importing them as you can add a lot more in depth detail when compared to a 2D sprite. The Blueprinting also seems a lot more logical than the drag and drop Action Event system, especially things like using velocity to move.

Tuesday 6 February 2018

Unit 6 - Critical Approach


Unit 6 - Critical Approach


How to find the market for the game 
To find the market for the game we will have to look at several thing, for example what are the levels of violence in my game perhaps if they're high then the age rating and therefore the target audience would start at 18, the same would go for swearing or sexual themes. We also have to think about what the game is based on, this being the film Big Trouble in Little China. The target audience for the film keeping in mind it came out in 1986 is around 18 to 30 and so this means people that would have seen the film back then would be around 25-50 today and so this also caters to what our audience is going to be.

Data
There are several different sources that both praise and criticise the film. Praise comes from IMDB which claims that the movie is an 7.3/10 and that 'This movie is magic'. However the estimated budget was around $25,000,000 and only looks to have made $11,100,000, meaning overall it lost profit. One person, who rates this a 3/10, says that the film simply isn't funny and tries too hard to 'explain the joke'. The film seems to have been more well received in America and we can tell this from the quantitative data that is provided by IMDB where it says the average score from America was 7.6 which is higher than any other country.

How did I conduct my research
I did my research by searching for ratings and reviews on the movie Big Trouble in Little China, there are several movie websites that provide that this data. By analysing the ratings we can see what age group, ethnicity and country enjoyed the films most.


How good was my research
I think my research was conducted well and was relatively accurate however I only had a few sources and so my data might not be as accurate as it could be. I do however feel like the information I extracted from the data presented was well thought out and precise. By expanding the range of my research I could get a more accurate representation of how the statistics show various data. Examples of this data would be which country the film was best received, where it made the most money, which age group found it most appealing and which gender preferred the film.


TASK TWO

How does the film target specific people
The country that gave the film  the highest score on IMDB was America and I believe this was the intended outcome when the film was being produced, as there are several aspects of the film that I think would appeal to the stereotypical American person. For example there are many over the top action scenes in the film that include many explosions and fight scenes. The film is also set in an American China Town something that the American population would be able to relate to. The main character Jack Burton is also played by an American actor Kurt Russell, a person who was a very big hit back when the film came out.

I think the film also specifically targets males, it does this through the actual story, by having Jack the hero trying to save a damsel in distress whom has been captured by another man. The film is saying that women are just around to be saved by men. The intense action sequences and colours included in these scenes also suggest that the film has been targeted towards men. For example one of the more predominant colours in this movie would be the colour red, which is more often a mans colour, can be spotted everywhere in China Town and all over Lo Pan's lair. I'd say the age group for the film would be anywhere from 16 to 40, the simple plot line and the humour of the film appeal to all ages and allows for a fun watch for everyone.


The Target Audience of My Game

My game has a very dark setting and the story involves many messed up demons and creatures. It will include violence, gore and swearing because of this I would rate at least an 18. The movie that my game is based on Big Trouble in Little China which came out in 1986 and so the audience of the movie back then would be around the age of 40 now. For both of these reasons the target audience for my game is going to be 18 to 40 years old, in terms of gender, I am going to make it so you can play as either a man or a woman and I hope these will be one of the main reasons that the target gender is both male and female. A game similar to mine would be anything from the Dark Souls series, its dark undertones match the themes of my game very well. The target audience is very similar to mine as well with most sources saying that its males around 20 to 40 years old. This is one of the main reasons that Dark Souls is such a successful series, its grounded and mature nature that appeals to this audience.

Wednesday 20 December 2017

Unit 4 & 5 - Task Two

Unit 4 & 5


I first started off by getting ideas for 4 different games and planning them out in depth, going though things like how I would pitch them, the story and what mechanics they involve.

https://drive.google.com/open?id=1rx4VDeZGFTjQXr7GaYOpGj83pV-sCdfk


The game that I have decided to take forward is the first one Demons of the Crest, I am most passionate about, have to most ideas for and have developed the furthest out of the 4. To develop it further I have created a padlet fleshing out the game a bit more, you can access this via the link below. There is also a link to some of the concept art I have done and how I want the theme of the game to come across

https://padlet.com/sazzaviolin/m8mhbfqtlbnt
https://drive.google.com/open?id=1US9Tqa9BvOqiuEf3H0wG736vMuQxQKBK


To do research into what people have experienced in games similar to mine i have made a survey to try to identify my target audience and see what mechanics they would want in the game. You can access this survey and the results through this link.

https://docs.google.com/forms/d/12Q2yiDkkXCuOUq5Mg41d0NzKW7-gur7q0_11JRJY2CE/edit#responses


This primary data will help me tailor my game to what my audience wants and try to avoid the things they thing might ruin the game. For example 100% of the people that answered my survey want to be able to relocate any attribute points that they spend and 60% of people wanted to be able to use a range weapon in the game, because of this I will try to implement these things into my game.
For the secondary data I have researched a similar game Dark Souls III to find out what people liked and disliked about these games. Things that where praised about DS3 included the dark atmospheric world and the tactical combat system. Some of the criticisms that came for DS3 included the fact that towards the end of the game instead of facing interesting new enemies, it throw cheap tactics and tricks at you to try to set you back.


The main reason Demons of the Crest is being taken forward as my final game idea is that I am passionate and excited about creating it. It was the one I preferred from the very beginning, I love the idea of Big Trouble in Little China being mixed with something dark and sinister along the lines of Dark Souls or Bloodborne. I also love the boss battles in these games and wanted to see if i could make something just as challenging and rewarding. This game has a better balance between achievable and optimistic in terms of work load. The research that I have done shows that these types of games are very popular and this is cemented by the sales figures. Overall i feel this game will be the best for me to create in many different aspects of development.

Friday 10 November 2017

Unit 66-67-67: Understand theory and applications of 3D

Unit 66-67-67: Understand theory and applications of 3D


Applications of 3D

There are many different types of uses for 3D not just modelling for games, it can also be used for television and films, one of the most famous uses on TV must be the dragons from Game of Thrones. The team at Pixomondo used modelling software such as ZBrush to design the dragons but also took real life aspects like a chicken that the animators played around with and work out muscle movements. One of the most impressive things i have seen was created in the Unreal Engine 4 is an architectural walk through of a house, its shows just how photo realistic 3D modelling can be.
Image result for game of thrones dragons productionhttps://youtu.be/E3LtFrMAvQ4?t=118
3D is also used for animation for anything from television to education.


An application programming interface or API, is used for different things. In Microsoft Direct3D the API renders 3D objects, most graphic cards these days support it due to how much it speeds up 3D rendering withing windows. One of Direct3D's competitors is OpenGL or Open Graphics Library which is a cross platform and language API.

What is a Graphics Pipeline

Image result for graphics pipelineThis is what we use to convert the 3D images in the program to the 2D images we see on our screen so we don't have to render the entire thing when we can't even see it. At the start we have the bus interface which basically tell the entire pipeline what to do. The vertex processing comes next and this gathers the information on where every vertex is on the shape and converts that into a 2D position on the screen, sometimes the vertex is given a colour based on the light hitting it. The parts of the image we cannot see are then remove completely, this is so we do not have to render them when we cannot see them and is called clipping. The vertices are then made into triangles and filling in with pixels to make them whole, these newly filled triangles are called fragments, this is known as the triangle set up and then rasterization. Occlusion culling then removes the pixels that we cannot see due to other objects for example if a rectangle was in front of a square, the pixels behind the rectangle would not be rendered. A value is then assigned to each pixel that was rasterized , this is the parameter interpolation. The pixel shader then determines the final colour and texture of the pixel. The pixel engine then takes the previous 2D object and applies the fragment colours to it to create a whole object on the screen, the thing that stores all of the information throughout this process is known as the frame-buffer controller.


Ray Tracing
Rendering Techniques

There are several different types of rendering techniques, one is known as ray tracing and this provides some of the harder effects to achieve such as shadows and reflections. It creates the object by tracing the path the light takes and showing it as pixels, then showing the effects it has when interacting with objects. To the left you can see the ray tracing of a sphere as it shows the shadows and reflections. 


As you can see radiosity has been applied onto the second image as it is diffusing the light correctly whereas direct illumination has occurred on the first image. However unlike ray tracing specular reflection has been ignored.


There are several types of lighting as well indirect light is where the light is reflected off of certain surfaces in the room and tries to mimic how it would look in a real life situation. For example light bouncing off of a mirror. Local illumination is where the light is coming directly from a light source, such as the sun that just shines right down on us. To help the performance of your PC when rendering you don't always have to render the entire model for example in the picture below the sphere is less detailed based on how close it is to the camera. This can be set in Maya by using groups.


Geometric Theory

All shapes will have certain aspects to them the main ones for modelling in programs like Maya are the vertices which act as the corners of the shape; the edges, which serve to join the vertices; and the faces that fill in the gaps between them. There are also different application for these for example the edges do not have to be straight they can curve. All of these put together make a polygon which we can them manipulate into whatever shape we need for our game, however only polygons that have been triangulated may be used this way. NURBS take up less data however are extremely heavy for your computer to run in video games since the shape is defined by mathematics. They are however used in cut scenes that have been pre-rendered. Primitive objects are mainly used to start off a design you can the move, rotate and scale the shape by using the coordinates given in most 3D modelling programs, X Y and Z. X being the horizontal, Y the vertical and Z the depth. 

There are several types of modelling the first of which being box modelling, where you use a primitive object to make the rough shape of the model you want and then sculpt more detail on top of it. Another type is box modelling this is where you import a front and side view into Maya and use shapes the trace the outline and end up with a 3D model.

Constraints

Image result for fbx fileThere are many constraints that come with 3D modelling. You first have to consider the platform you are creating for as this will have a big impact on what you can and cannot do for example the amount of polygons per model will have to be lowered if you were creating for mobile when compared to PC. If there are too many polygons the game will become slow due to how much it is trying to render, this is also where file size comes into play. People don't want to fill up loads of space on there machine/phone with one game they often want many and if you are using large models and detailed textures to file size will increase. It will not only take you a long time to upload but will also take ages for the players to download it as well. By reducing the polygon count you can lower the file size. 3D modelling programs often have an optimisation option built in allowing the program to cut out all of the bits it knows it isn't using. There are two types of rendering time, one being real time this is where models and textures are rendered on the go, in game. This often uses the GPU and can slow your game down if there is too much information to render at any one time. The other, pre-rendering, is when the model is rendered over time, this could take a varied amount of time based on the size of the model and/or animation. Companies often use several machines to render at once to lower the time it takes to complete.